How to Build a Skibidi Toilet Scene on a Compatible Base Plate
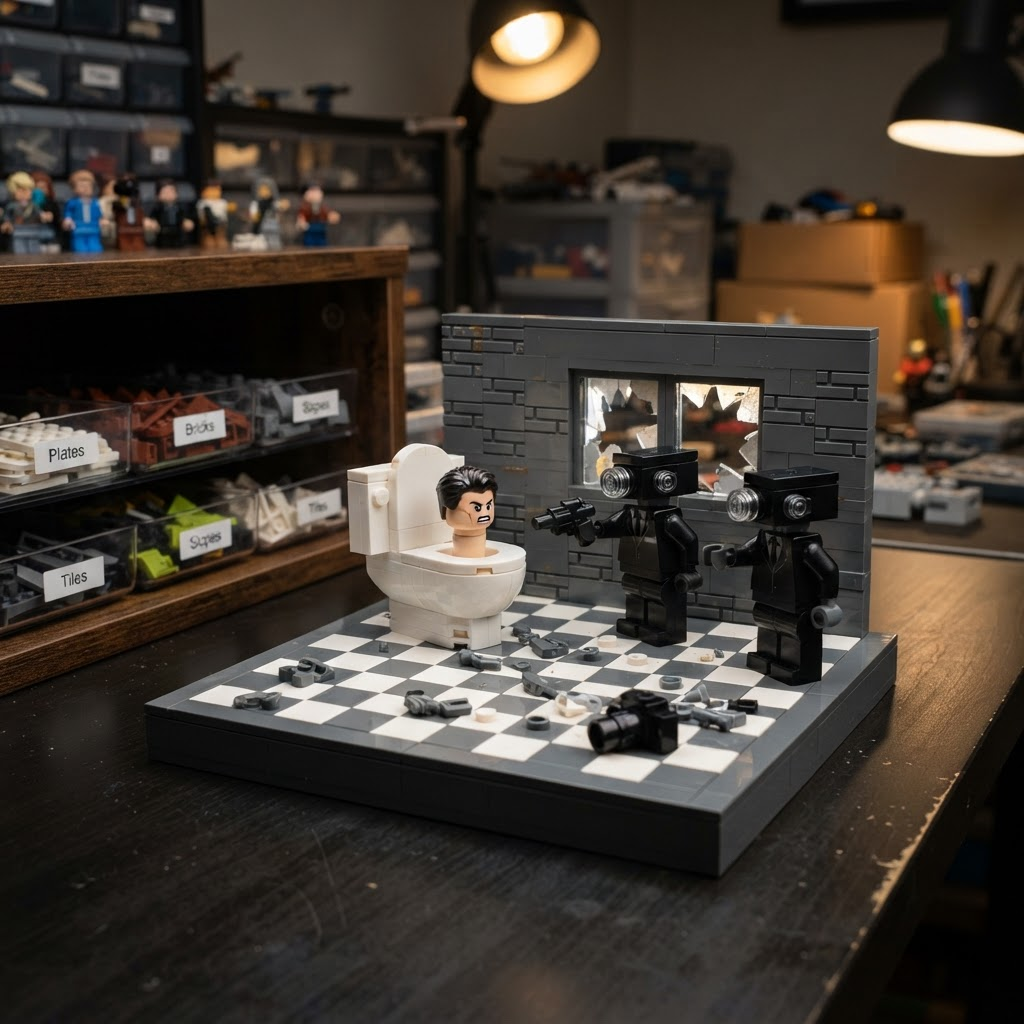
A great build always starts with the right foundation. This guide shows you how to pick the correct lego compatible bricks base plate, combine mega bloks lego compatible parts into one working pool, and build a complete lego compatible skibidi toilet diorama — characters, backdrop, and finishing details included.
Quick Takeaway
Base plate first, parts pool second, scene third. Choose a rigid ABS plate, zone your layout before building, combine all compatible brands into one type-sorted bin, then build characters from the outside in. Follow that order and the scene comes together fast.
Why the Base Plate Decides Everything
The base plate is the ground your whole scene stands on. It sets the scale, holds the layout, and keeps every wall square. A good plate does three jobs:
Anchors the Build
Bricks lock to the plate and stay put during display and transport.
Sets the Grid
Every stud is a reference point — walls line up and gaps disappear.
Defines the Footprint
The plate size caps how big your scene can grow and whether you need to join plates.
Common Mistake
Builders grab any flat piece and start stacking. A true base plate is thinner, wider, and gridded across the full surface — built to hold a whole scene, not just to sit under it.
Step 1: Choose the Right Compatible Base Plate
Not all plates are equal. Size, thickness, and stud accuracy all change how your scene builds and displays. Here is how to choose before you commit.
Match Plate Size to Your Scene
| Scene Type | Recommended Plate | Notes |
|---|---|---|
| Single character + prop | 16x16 studs | Compact, easy to store |
| Room or street corner | 32x32 studs | Enough room for walls and props |
| Multi-character standoff | 32x32 + joined second plate | Skibidi toilet vs. Cameraman scene |
| Full Titan diorama | Two or more 32x32 joined | Leave stud border on each edge |
Check Thickness and Flex
A thin plate bends under a tall build. Look for a rigid plate that stays flat when you lift one corner. A lego compatible bricks base plate made from quality ABS holds its shape for years without warping. You can compare plate specs at Morebybourn before committing to a board size.
Confirm the Stud Grid Runs True
Lay a row of bricks across the full width. The last brick should land dead-center on the last stud. If it drifts, the plate is off-spec and every large build on it will show gaps.
Step 2: Set Up Your Base Plate Layout
Before a single wall goes up, plan the floor. A few minutes here saves a full teardown later.
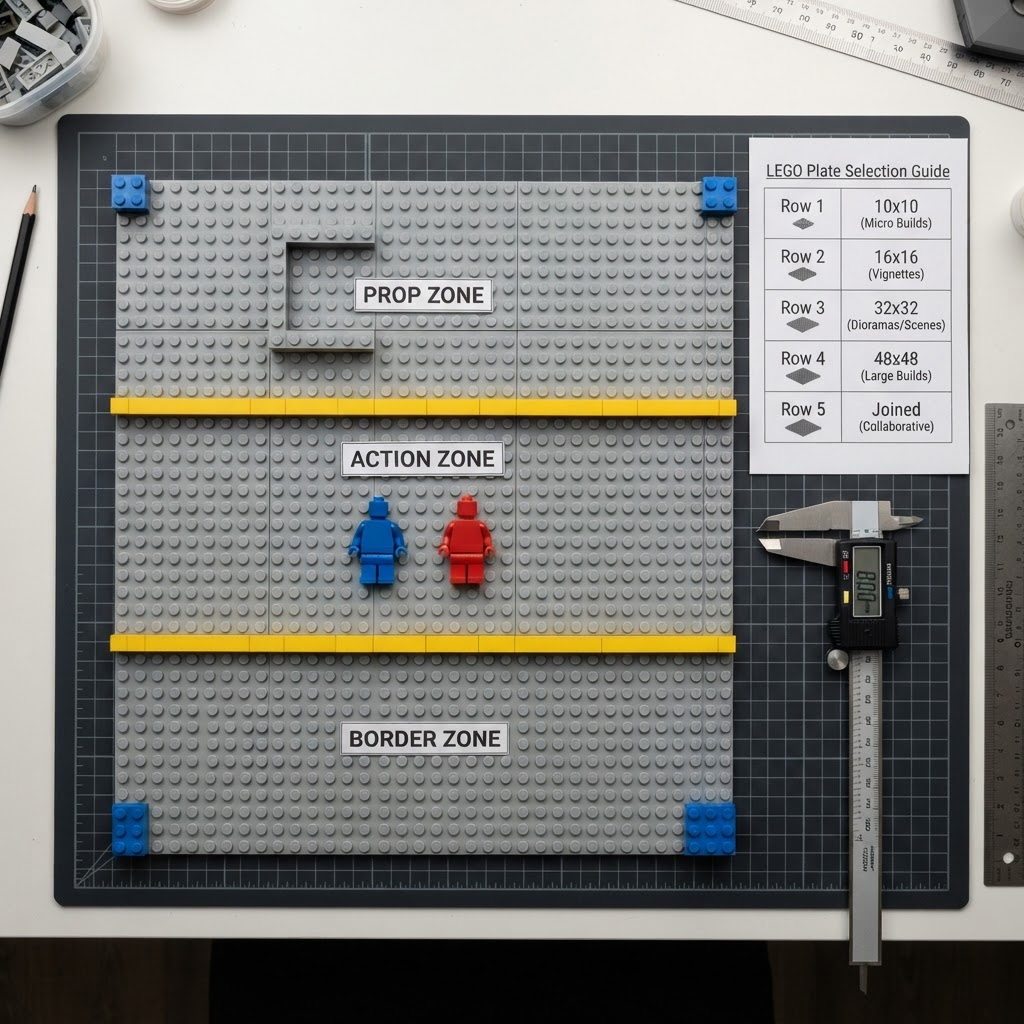
Map the Zones
Divide the plate into Action Zone (characters), Prop Zone (walls, furniture), and Border Zone (clean outer edge frame).
Lock the Corners First
Snap a brick into each corner of the plate. Corners anchor the layout and stop the build from drifting as you add pieces inward.
Leave Room to Grow
Don't the plate to the edge. Leave a stud or two of open border — that margin lets you extend the scene or join a second plate later.
Step 3: Build One Parts Pool From Mixed Brands
Combine all compatible pieces into one working pool. Sort by part type — not by brand — so you always reach for the right piece.
Sort by Part Type, Not Brand
- +Plates in one tray
- +Standard bricks in another
- +Slopes, tiles, specialty pieces in separate bins
- +Reach for the part the scene needs, not the box it came in
Put Mega Bloks to Work
Are mega bloks lego compatible with the rest of your bricks? For most standard lines, yes — the stud spacing matches the mainstream 8mm grid, so they lock onto the same plates and stack with other compatible bricks.
Use larger Mega Bloks for fast bulk structures like the toilet body. Reserve firmest-clutch bricks for stress points like raised arms or a character neck joint.
Common Mistake
Keeping brands in separate boxes doubles your search time and hides half your usable parts. Merge into one type-sorted pool before you start building.
Step 4: Build a Skibidi Toilet Character Model
The Skibidi Toilet theme is one of the most-searched build ideas right now. Shapes are simple, characters are iconic, and the scene invites custom detail. Here is how to build a basic lego compatible skibidi toilet figure from your mixed parts pool.
Build the Toilet Base
- +4x4 or 6x6 white brick section for the bowl (2 layers tall)
- +Taller narrow stack behind it for the tank (3–4 bricks high)
- +White tiles on the rim for a clean porcelain look
Add the Popping Head
- +Small 3x3 stud head in flesh-tone or gray bricks
- +Printed tiles or round pieces for eyes and mouth
- +Mount on a single connector stud — pops up and lifts out easily
Build Rival Characters
- +Cameraman: boxy body + 2x2 black brick camera head with round tile lens
- +Speakerman: stacked speaker shapes + tile grilles on front
- +Titan versions: scale any character up 2x for a boss figure
For more character templates and MOC inspiration, browse the build guides at Morebybourn — they give you starting points you can remix into your own scene. You can also explore our accessory and minifigure guide for detail pieces that work across brands.
Step 5: Turn Figures Into a Full Scene
A single figure is a toy. A scene is a display piece. Four additions separate the two.
Add a Battle Backdrop
Build a low wall along the back edge of your plate. Add a doorway, window, or broken section for a battle-worn look. It frames the action and hides the plate's back border.
Populate the Action Zone
Space characters so each one reads clearly. Face the Cameramen toward the toilets for the classic standoff. Leave a stud of gap between figures so nothing looks crowded.
Add Small Story Details
A knocked-over toilet, a dropped camera piece, tiles as a checkered bathroom floor, a raised platform for a Titan boss — small touches sell the scene.
Frame the Edges
Run a border of contrasting tiles around the plate's outer edge. A clean frame makes even a simple build look finished and display-ready.
Step 6: Display and Share Your Build
Keep It Stable
- +Press every connection firm during build
- +Always move the scene on its plate
- +Add removable putty under tall leaning figures
Photograph It Right
- +Shoot at eye level with the characters
- +Use a plain background so the scene pops
- +Natural window light beats overhead room light
Join the Community
- +Post to a brick-builder forum or subreddit
- +Tag it as a custom MOC build
- +Community challenges around trending themes come up often
Your Build Plan in Five Moves
- 1Pick the right plate. Match size to scene, confirm the grid runs true, choose rigid ABS.
- 2Zone the layout. Corners first, build inward, leave a stud-wide border on every edge.
- 3Pool your parts. Sort by type across all brands — plates, bricks, slopes, tiles.
- 4Build the characters. Toilet base, popping head, Cameraman and Speakerman rivals.
- 5Finish the scene. Backdrop, small story details, edge frame, then photograph and share.
Related Guides
How to Choose and Use Compatible Building Blocks and Base Plates
Plate selection, scale matching, flat vs rigid, brand-mixing guide.
How to Find, Test, and Mix Bricks Compatible With LEGO
5-minute fit test, brand verdicts, and smart mixing strategies.
How to Choose and Build with LEGO Compatible Sets
6-point buyer checklist, skill matching, and integration tips.
How to Mix LEGO Alternatives: A Practical Compatibility Guide
7-step brand-mixing framework, 4 home tests, and red-flag checklist.
Ready to Start Your Build?
Browse compatible base plates, mixed-brand brick sets, and specialty parts at Morebybourn — everything you need to go from a loose box of bricks to a display-ready Skibidi Toilet diorama.